Paint Protection Film Removal Guide: Step-by-Step Tips by Professionals
Keeping your car's finish shining and pristine is no easy feat. Over time, elements like dust, dirt, and daylight can wear out your vehicle's paint job. This is where Paint Protection Film (PPF) swoops in to save the day - acting as a superhero shield against environmental miscreants. But what happens when this loyal defender starts to show signs of aging and wear? It's time for removal, but don't fret! This is not as daunting as it might seem.
We're about to lift the curtain on comprehensive professional tips for paint protection film removal, laying it out all step-by-step. Prepare for an inside look at a hidden aspect of auto detailing that will keep your ride looking as stunning as the day it won the race off the dealership lot.
Step-by-Step Paint Protection Film Removal Guide
Removing paint protection film (PPF) can be a daunting task, but with the right approach and techniques, it can be done effectively. Here is a step-by-step guide to help you through the process:
- Gather the necessary tools: Before diving into the removal process, it's crucial to gather the right tools to ensure a smooth operation. Some of the tools commonly used for PPF removal include a heat gun or hairdryer, a plastic scraper or squeegee, adhesive remover, and optionally a spray bottle with soapy water.
- Prepare the area: Before starting the actual removal, it's important to prepare the surrounding area. Park your vehicle in a well-ventilated space, ideally out of direct sunlight. This will make it easier to work with the PPF and prevent any potential damage that extreme heat can cause.
- Apply heat: Using a heat gun or hairdryer, gently apply heat to the PPF. This softens the film and loosens the adhesive that holds it in place. Keep the heat gun at a safe distance to avoid overheating or damaging the paint surface beneath.
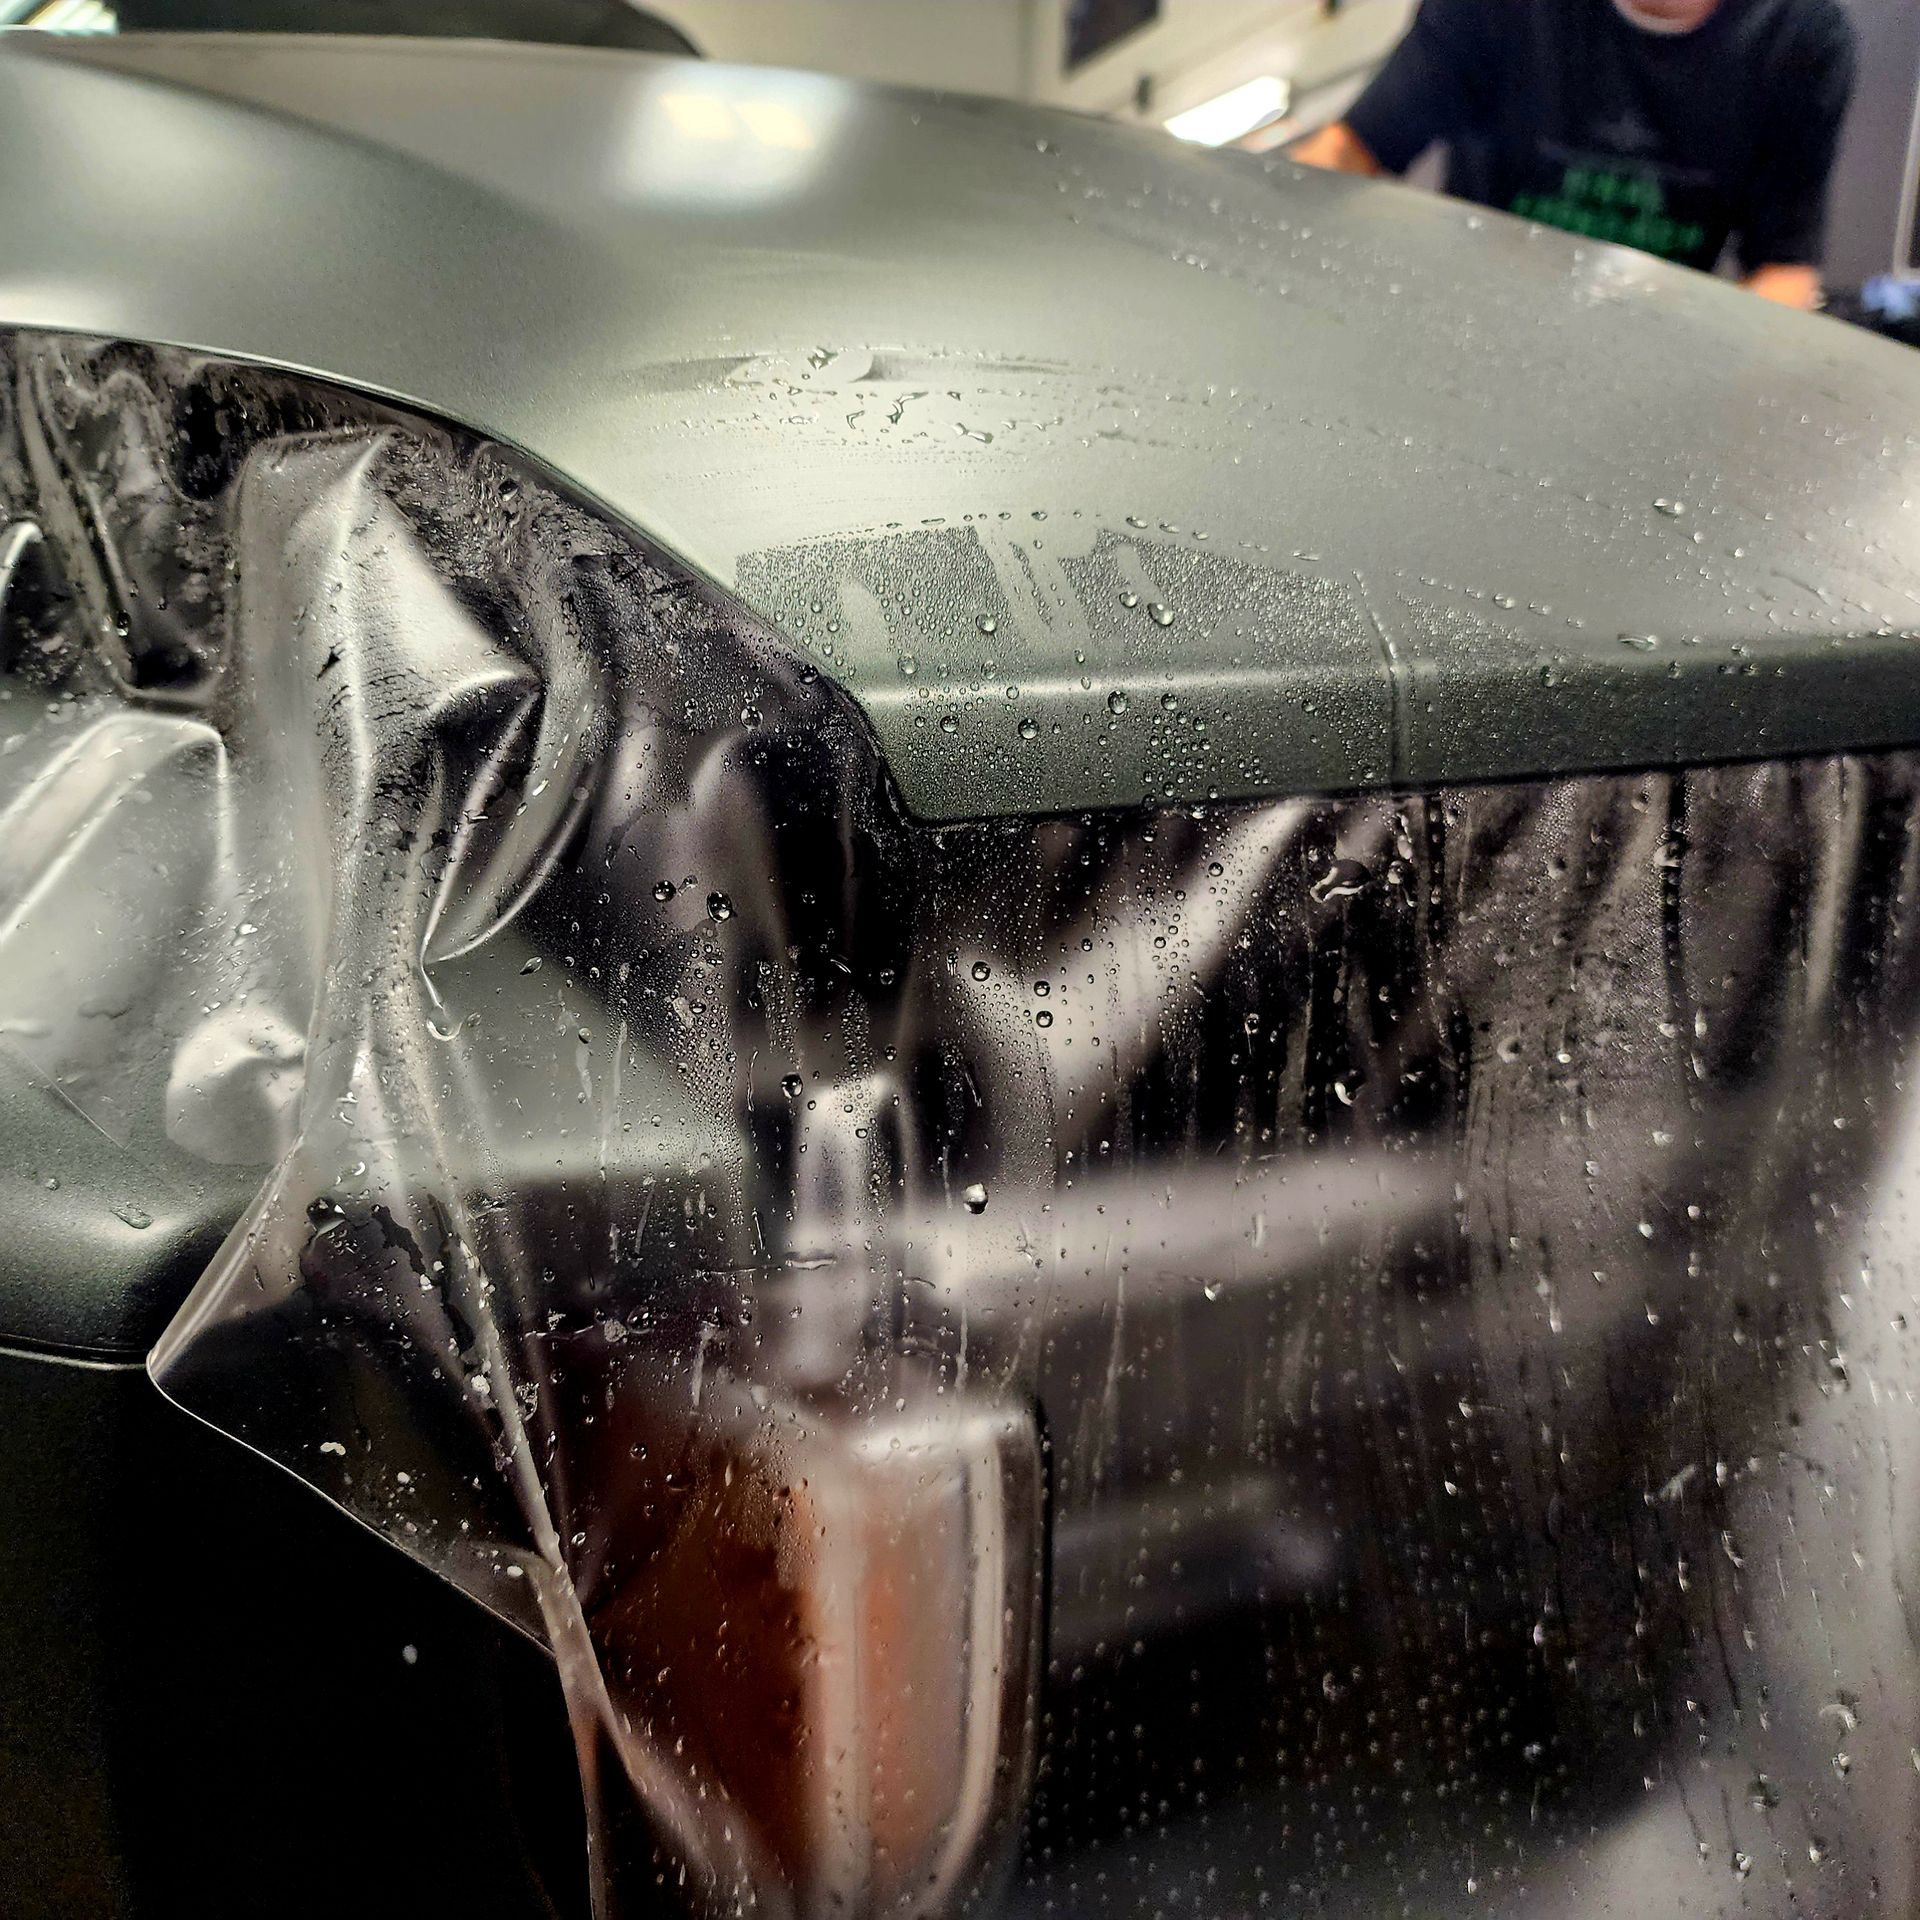
- Peel off the film: Once the film has been heated adequately, start peeling it off slowly using a plastic scraper or squeegee. Apply gentle pressure while pulling at an angle of approximately 45 degrees. If you encounter any resistance or stubborn spots, reapply heat as needed and continue peeling.
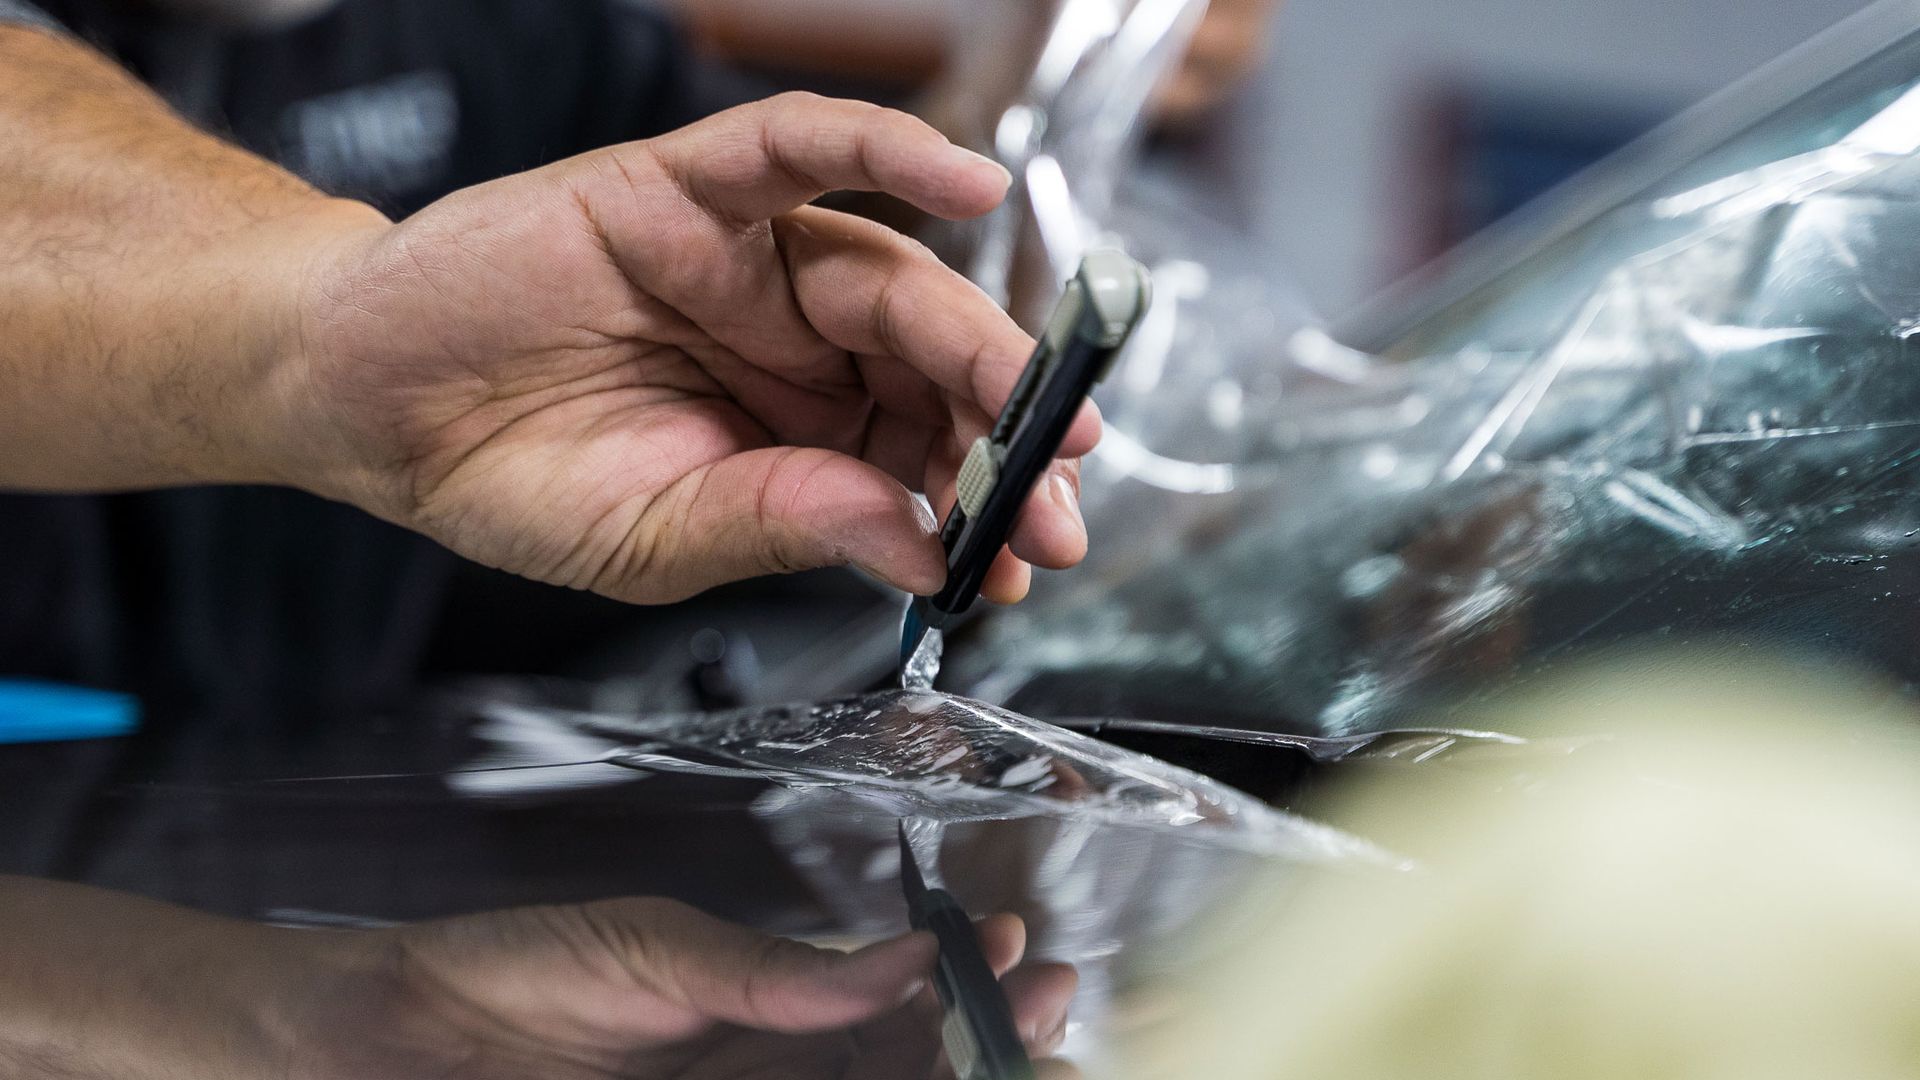
- Remove adhesive residue: After removing the PPF, you may find remnants of adhesive left on the vehicle surface. To remove this residue, use an adhesive remover specifically designed for automotive purposes. Apply it to a clean cloth or sponge and gently rub over the affected areas until all traces of adhesive are gone.
- Clean up and inspect: Once all traces of PPF and adhesive are removed, it's important to clean the area with soapy water to remove any leftover residue. After cleaning, thoroughly dry the surface and inspect it for any signs of damage or imperfections that may require further attention.
- Restore and maintain: If necessary, restore the paint condition by applying wax or polish to the affected area. This will help bring back the shine and protect the paint from future damage. To maintain the car's exterior in optimal condition, regularly wash it and consider applying wax or sealant as part of your routine maintenance.
By following these step-by-step instructions, you can remove paint protection film effectively without causing damage to your vehicle's paintwork. Remember to take your time, work carefully, and exercise caution throughout the process.
Assembling the Right Tools
Properly assembling the right tools is a crucial first step when it comes to removing paint protection film (PPF) successfully. Having the necessary tools on hand ensures that you're well-prepared for each stage of the removal process.
To begin with, a heat gun or hairdryer is essential for softening the film and loosening its adhesive. It generates controlled heat that allows you to work without damaging the underlying paint surface. Using a heat gun with adjustable temperature settings gives you more control over how much heat is applied.
Next, plastic scrapers or squeegees come into play as they enable you to peel off the softened film from the surface. Opt for tools made of plastic rather than metal to avoid scratching or gouging the paintwork during removal.
An adhesive remover is another vital tool needed to eliminate any residual adhesive after peeling off the PPF. Look for an automotive-specific adhesive remover, as it is formulated to dissolve sticky residues effectively without harming the paint finish.
Optionally, having a spray bottle with soapy water can be useful for wetting the film during removal. This can help in providing lubrication and minimizing potential damage to the paint surface when peeling off the PPF.
Preparation of Vehicle for Remediation
Before diving into the process of paint protection film (PPF) removal, it is crucial to prepare your vehicle adequately. This preparation will ensure a smooth and efficient removal process while minimizing the risk of any damage to your car's paint. Here are some important steps to consider when preparing your vehicle for PPF remediation:
First and foremost, gather all the necessary tools needed for the removal process. These may include a heat gun or hairdryer, a plastic scraper or squeegee, adhesive remover, and optionally a spray bottle filled with soapy water. It's also advisable to have safety equipment such as gloves and goggles to protect yourself during the removal process.
Next, thoroughly clean the car's exterior using a mild detergent or automotive soap. This will help in removing any dirt, grime, or debris that could interfere with the PPF removal process. Ensure that you rinse off all the soap residue and dry the vehicle completely before proceeding.
Inspect the PPF carefully to identify any areas that might require special attention during the removal process. Look out for edges or corners where the film might be firmly adhered or any signs of damage that could impact the overall integrity of the paint underneath.
Additionally, if you have previously applied wax or sealant to the PPF, it is recommended to remove them beforehand using an appropriate product. This will allow for better access to the film and make the removal process more effective.
Finally, protect any delicate parts of your car that are not covered by PPF but could come into contact with heat during the removal process. You can use painter's tape or masking tape to cover these areas and prevent accidental damage from occurring.
By taking these preparatory steps, you'll ensure that your vehicle is ready for a successful PPF removal experience. Now that we have discussed how to prepare your vehicle, let's move on to proven techniques for safe removal.
Proven Techniques for Safe Removal
When it comes to removing paint protection film (PPF) from a vehicle, there are several proven techniques that professionals swear by. These techniques can help ensure that the removal process is safe and effective, minimizing any potential damage to the underlying paint. Let's explore some of these techniques:
- Applying Heat: Heating the PPF is a crucial step in loosening the adhesive bond and making the film easier to remove. You can use a heat gun or hairdryer set on low heat to gradually warm up the film. Keep the heat source moving back and forth over the surface of the film, avoiding prolonged exposure, to prevent damage to the paint.
- Gentle Peeling: Once the film has been adequately heated, you can begin peeling it off using a plastic scraper or squeegee. Start from one corner of the film and gently lift it away from the surface, applying even pressure as you go. If you encounter resistance or stubborn areas, reapply heat and try again until the film peels off smoothly.
- Adhesive Removal: After peeling off the PPF, there may be residual adhesive left on the car's paint. To remove this adhesive, apply an adhesive remover specifically designed for automotive use. Follow the instructions provided with the remover, applying it to a cloth or sponge and gently rubbing away the adhesive residue. Be cautious not to scrub too hard to avoid scratching the paint.
- Cleaning and Inspection: Once all traces of adhesive have been removed, clean the area thoroughly using soapy water and a microfiber cloth or sponge. Rinse off any soap residue and dry the surface completely before inspecting for any missed adhesive spots or potential issues with the paint.
Remember, while these techniques have been proven effective, it's essential to exercise caution during PPF removal. If you're unsure about any aspect of the process, it's recommended to seek professional assistance to prevent any accidental damage.
Applying Heat to Soften Film
Removing paint protection film (PPF) can be a challenging task, but one effective method is by applying heat to soften the film before peeling it off. This process helps loosen the adhesive bond, making the film easier to remove without damaging the underlying paint.
To begin, gather the necessary tools for PPF removal, including a heat gun or hairdryer, a plastic scraper or squeegee, an adhesive remover, and optionally, a spray bottle with soapy water. Safety precautions should be taken when using heat-generating tools, such as a heat gun.
Start by heating the PPF using a heat gun or hairdryer. Hold the tool approximately six to eight inches away from the film and move it in a circular motion to evenly distribute the heat. It's crucial not to overheat the film, as this can cause damage to both the PPF and the vehicle's paint.
As you apply heat, pay attention to any changes in the appearance of the film. The PPF will start to wrinkle and bubble slightly as it softens under the heat. These visual cues indicate that the adhesive is loosening its grip on the vehicle's surface.
Once you notice these signs, take your plastic scraper or squeegee and gently start peeling off the softened PPF. Begin at one edge of the film and slowly work your way across, applying more heat if needed during stubborn spots. Be careful not to rush this step; patience is key to avoiding any accidental damage.
Remember, always follow the manufacturer's instructions and recommendations when using heat guns or hairdryers. These tools can generate high temperatures that may cause harm if mishandled or used incorrectly. Take breaks as needed to prevent overheating the PPF or damaging the paint.
Aftercare Tips Post-Removal
After successfully removing the paint protection film from your vehicle, it's essential to take proper care of the area to ensure a smooth and protected finish. Here are some valuable aftercare tips:
- Inspect the area: Thoroughly examine the surface where the PPF was removed. Look for any remaining adhesive residue or damage to the paint caused by the film removal process.
- Remove Adhesive Residue: If you notice any adhesive residue, use a dedicated adhesive remover to gently clean off the remaining sticky residue. Follow the instructions on the adhesive remover product and use a microfiber cloth or sponge for better control.
- Wash with Soapy Water: Once all adhesive residue is removed, wash the area with soapy water to remove any remaining dirt or debris. Use a mild car shampoo and a soft sponge or microfiber mitt to prevent scratching the paint surface.
- Restore Paint Condition: Depending on the condition of your vehicle's paint after PPF removal, you may consider restoring its shine and protection. Use a suitable polish or wax to rejuvenate the paintwork and enhance its appearance.
- Regular Maintenance: To keep your car looking its best, establish a regular maintenance routine that includes washing, waxing, and applying a sealant or protective coating periodically.
By following these aftercare tips, you can ensure that your vehicle's paint remains in excellent condition even after removing the paint protection film.
Avoiding Common Mistakes in Film Removal
When it comes to removing paint protection film (PPF), there are some common mistakes that many people make. These mistakes can lead to damage to the vehicle's paint, leave behind adhesive residue, or result in ineffective removal of the film. To ensure a successful and safe PPF removal process, it's important to be aware of these common pitfalls and avoid them.
One common mistake is not adequately preparing for the removal process. It's crucial to gather all the necessary tools and materials beforehand, such as a heat gun or hairdryer, plastic scraper or squeegee, adhesive remover, and optionally a spray bottle with soapy water. Failing to have these items ready can lead to frustration and potentially damage the paint or prolong the removal process.
Another mistake often made is attempting to remove the PPF without applying enough heat. For example, if the film isn't sufficiently heated, it will be harder to peel off and may tear, leaving behind fragments that need additional work to remove. Using a heat gun or hairdryer on a moderate setting can help soften the film and loosen the adhesive, making it easier to peel off in one piece.
Using excessive force during the removal process is another common mistake. Applying too much pressure when peeling off the film can cause damage to the underlying paint. It's important to take a gentle approach and be patient as you slowly peel off the film, reapplying heat if necessary. By being gentle and patient, you can minimize the risk of damaging the paint.
One critical aspect that should not be overlooked is properly cleaning off any adhesive residue after removing the PPF. Neglecting to do so can result in sticky residue that is challenging to remove and can mar the appearance of the vehicle. Make use of adhesive removers specifically designed for automotive purposes, following the instructions carefully to ensure thorough removal of any residue.
Taking care of the removed area after PPF removal is also essential to avoid future issues. For example, it's crucial to inspect the area thoroughly for any signs of damage or imperfections that may need further attention. This inspection will help identify if any touch-up paint, polish, or wax is required to restore the condition of the paint.
Once the inspection is completed and any necessary touch-ups are made, it's important to establish a regular maintenance routine for your car's exterior. Keeping up with regular washing and applying wax or sealant will not only enhance the appearance of your vehicle but also provide added protection against environmental elements and maintain the longevity of your paint.
By being aware of these common mistakes and taking the necessary precautions, you can confidently embark on your PPF removal journey, knowing that you have equipped yourself with the knowledge needed for a successful and smooth process. If you want to learn more about the process, don’t hesitate to contact our experts at
Final Approach Detailing!